Students, especially in the early grades, need concrete examples of using algebraic concepts, even our youngest learners. Algebra tiles offers a great way to see an expression or what makes a variable different from an integer.
When I first started teaching, using manipulatives in the classroom was stressed as one of the most valuable ways for students to understand abstract concepts. The school purchased sets of Algebra tiles and we used them with great success. And as educational trends change, a few years went by and then the emphasis became Hands on Equations.
Both are great manipulatives to use in the classroom and offer valuable opportunities to explore concepts using concrete examples.
What Are Algebra Tiles
Algebra tiles are manipulatives. The look like the following:

This is a standard set which is used most often. The small squares are units/integers. The rectangle represents “X” and the large square represents “X2”. They are double sided and one side of each piece is red which represents the negative. The other side is positive and the colors are different: small square is yellow, rectangle is green and large square is blue. However, in some sets, the positive colors vary slightly.
Here is the expanded set. This set includes pieces to represent both X and Y variables.
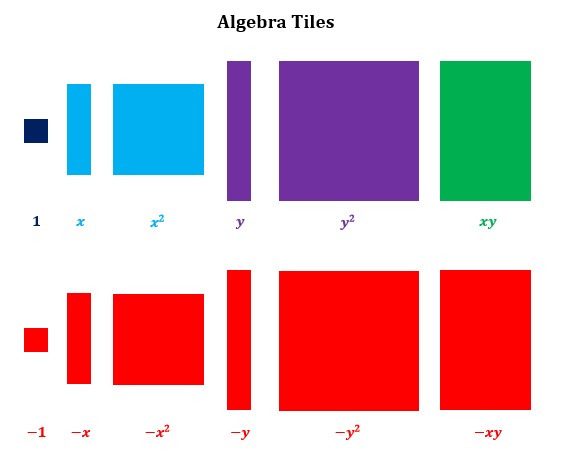
The expanded set is more valuable for advanced Algebra topics and typically not used in the algebra 1 classroom. But it is useful to introduce the different pieces to students so they can visually see that X and Y are different.
How To Get Them
You can purchase them, make them or use a free online resource. Your school may have sets of these somewhere that you could use. Ask veteran colleagues if they have old sets.
Buy Them
I purchased a class set many years ago and every year a few of them are lost (?) and I have to reorganize them in separate bags and add a few more pieces. Most educational supply stores have them available or you can order through Amazon. You will want 1 set for each pair of students so students can work together and discuss.
Ordinary baggies make the perfect storage for them. To make it easier to put them away, put a label on the bag with the quantity of each piece so students can round up any strays. When I first began using them, the disappearing pieces would make me a little crazy, but now I just let it go. It is not worth the stress of finding the lost pieces.
Print Them Yourself
You can make them using the following template. Print the pages on colored cardstock and laminate in the colors indicated on the template. I usually have students work in pairs so one set printed would be enough for 4 students or 2 sets. If you do not have colored cardstock, print them out on white paper and have students color them. Just make sure your provide the colors for each piece. File Here
Online
An online platform is an option even if students do not have devices and will use purchased manipulatives. An online platform is very useful for teachers to display problems for the class. Students can also use the platform to come and demonstrate/ present solutions to the class. Here is one online resource- Online Algebra Tiles.
Mats
You will also want mats for students to use when solving equations. I made a simple mat and then laminated them. This allowed students to place the pieces on the mat, then write the equation on the mat. When finished with the problem, they could wipe clean and start a new problem.
Before using in class the first time, you will need to think about a few things.
Manipulatives Management
How will you store them? I put basic sets in see thru baggies with the higher level sets in their own bags since we use them less often. I keep mine in a basket and the days they are used, put the basket out on the table.
Distributing to Students
What will be the procedure for passing them out? I have students designated to get the sets for 10-12 students each. They also collect and return the sets to the basket. I ask the students to count and make sure they sets are complete in the bag before they are returned, but they fall on the floor, people are in a hurry and kids forget. Assume that the sets will get mixed up and you will stress less about it.
Algebra Tiles to Go?
Will you allow students to take them home? If you have purchased sets, then I would make the printed sets for home use. Give students the printed pages (not laminated) and let them take those home to work with. Your purchased sets will disappear quickly if they leave the class.
While the online platform is an option, students may lack the access to the internet. Whenever you assign work at home, even with the online platform to assist, make sure students draw and write the solutions.
Ongoing Use
When I was a new teacher I used several types of manipulatives and kept telling my colleagues how well students were doing because they could see relationships and move them around. One of the teachers asked to borrow some sets, did a lesson and a few weeks later told me they did not work at all. She had used them one day, and when she did not see immediate improvement decided they were not useful at all.
Consistency in Using Manipulatives
Consistency is the word. Using them every lesson until students are comfortable will ensure students can visualize the concept. Having them draw the problem will help them understand the representational picture of the problem. And having them write using variables and math will help transition to the abstract concepts.
The goal is to have students use them in the beginning of every appropriate lesson and then transition to abstractly doing the math without manipulatives. But every student progresses at a different rate. Having them available when students want to use them gives some support to struggling learners.
How to Begin
Start by demonstrating simple ideas. Name the pieces and let students play with them. Will students use them to make a silly picture? Yes, of course. But give them time and then start by doing something simple.
Identifying
Ask students to tell you what these represent. Give them different pictures and ask what each one means. Here are three different ones in increasing difficulty. If students get stuck on any, they need more examples. Continue to practice until students find it too easy.

Counters
At a basic level, have students add and subtract. Use the tiles for counters.
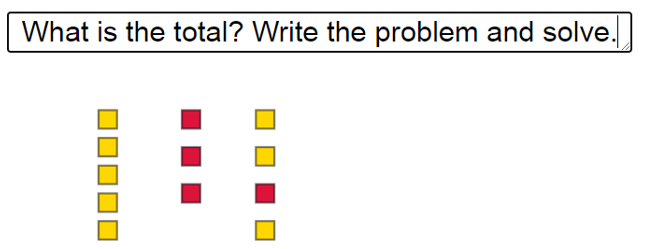
For this problem students would write 5 -3 +2. And the answer would be 4. It is important that students do not do the work “in their head”. When they skip steps on simple problems, they do not have the foundation to solve the more difficult problems.
Zero Pairs
This is one of the important concepts in solving equations. Students need to understand that when you use inverse operations you are making zero on one side of the equal sign. There are two ways to understand this problem. The first is to notice that there are 5 positive units and 3 negative units. So the problem is 5-3 which equals 2.
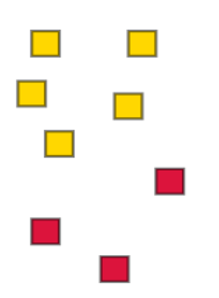
But the problem can also be solved by pairing 1 yellow with 1 red. This makes zero and is called the zero pair. I think we math teachers talk about zero pairs and making zero pairs but do not actually show why it is called this,
Create an Expression

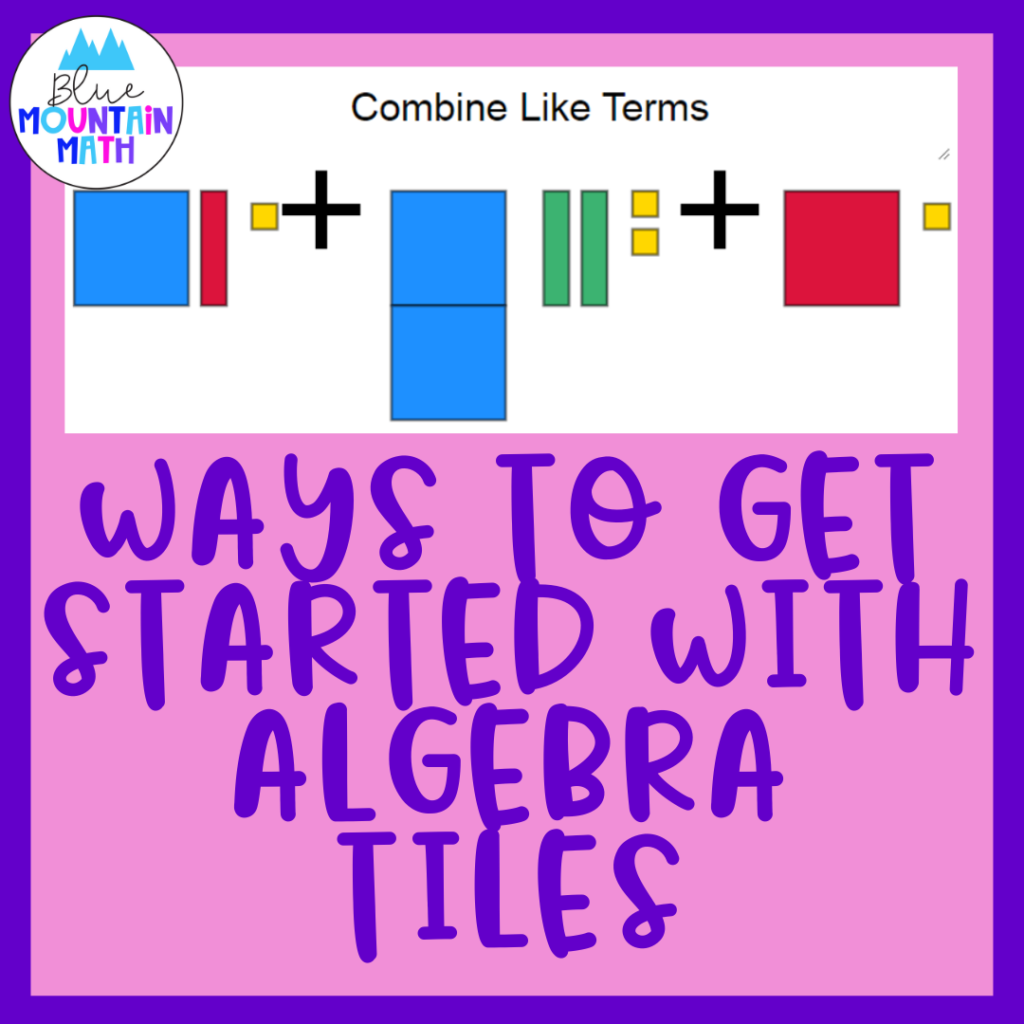
Combine Like Terms
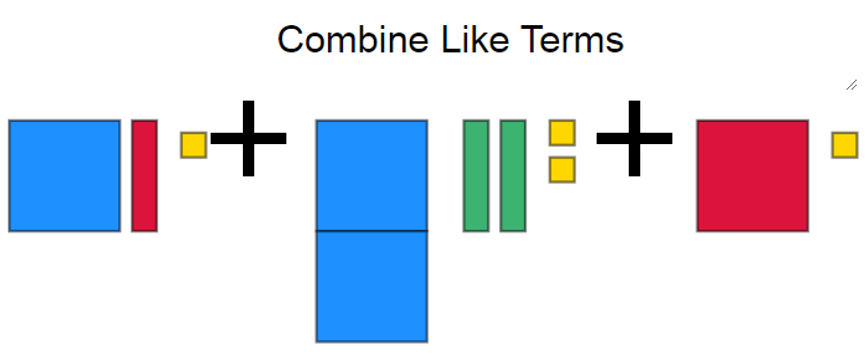
Once students understand the process, have them make representations for another student to solve. As before, students need to write the expression before combining.
Solving Equations by Adding and Subtracting
Being able to solve equations is a foundational skill in Algebra and beyond. Students who cannot solve equations are at a huge disadvantage and in many cases cannot advance to higher level mathematics classes. This means their college options can be limited.
So it is crucial that students practice in many ways to solve problems like this. They need to draw the problem (either on a worksheet, in an interactive notebook or on a math like the one shown), then write the problem, model solving and find the solution.
Using the Mat
Students use a mat when solving equations and that line in the middle represents the equal sign. Have the students think of it like a block wall.
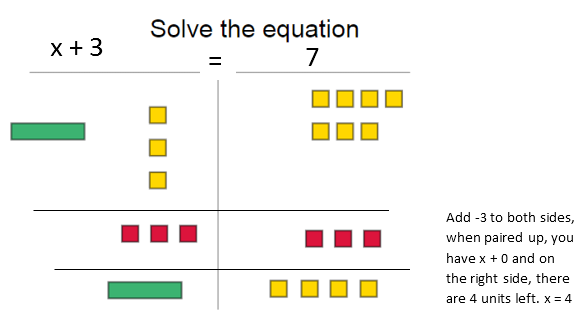
To solve draw a horizontal line to model the tiles in each step.
Solving Equations by Multiplying and Dividing
Students should write 2 x on the left side above the line and +6 on the right side above the line. We then show our steps by drawing a line below the initial problem. In this case I need to divide both sides by two. This means I separate both sides into two groups, and remove one of the groups.
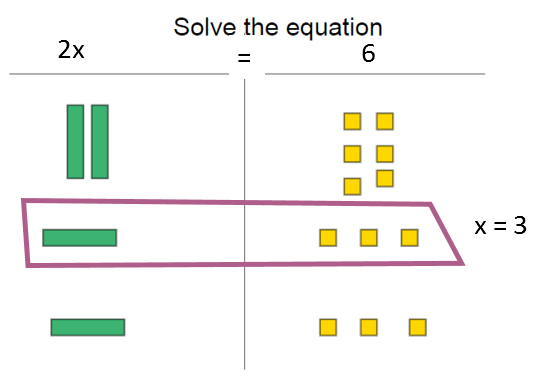
This has only been a beginning exploration with some basic skills. Start slow and build on student success. Next week we will explore solving two step equations and equations with variables on both sides. If you need a printable set of Algebra tiles, click here to get a set.
For more help on solving equations in you class, check out this great post called: 7 Ways to Improve Your Math Intervention for 2 Step Equations.
Have you found success with Algebra Tiles and can add a tip? Leave a comment and let’s share.


Leave a Reply